Episode 7 - Laundry and Fishing... "A Day in the Life of"
Saturday, April 22, 2017
Friday, April 21, 2017

Monday, April 10, 2017
Hard top
I thought it was time I spoke about the hard top. Why did we build it, and the story of the build.
We had a canvas dodger and Bimini for close to 20 years.
 |
| Sailing into San Francisco 2008 |
Over the years we covered the Bimini with solar panels, so the temporary nature of a canvas cover was lost. Also, the thread rotted out while we were in Mexico so we started thinking of a more permanent solution. I had admired the large hard tops most catamarans have, with lots of room for solar panels. They also seemed to be cooler than a canvas top in the tropical sun. Since we were already planning to repainted the hull and decks, I figured it would be easy enough to build a hard to as well. In theory this sounded ok to me. Jacquie said that in practice it sounded like a lot of work. Or a lot of money for someone else to do it. I'm cheap, so I talked her into helping.
Lots of YouTube videos later I knew I needed a pattern. So I talked Jacquie into making me one out of some cardboard boxes taped together. The pattern was a little rough but she was smart enough to tell me that it was ok to built the top without the kinks.
 |
| Jacquie and quality control |
 |
| First layer of Nytech |
It took the entire month of March to glass both sides and to prep for the stringers. We were working in an unheated garage and on weekends. I need to keep working to pay for all of the materials after all. While Jacquie is retired I could not, try as I might, talk her into working on the top while I was at work. Something about the 5C temperatures and toxic fumes.
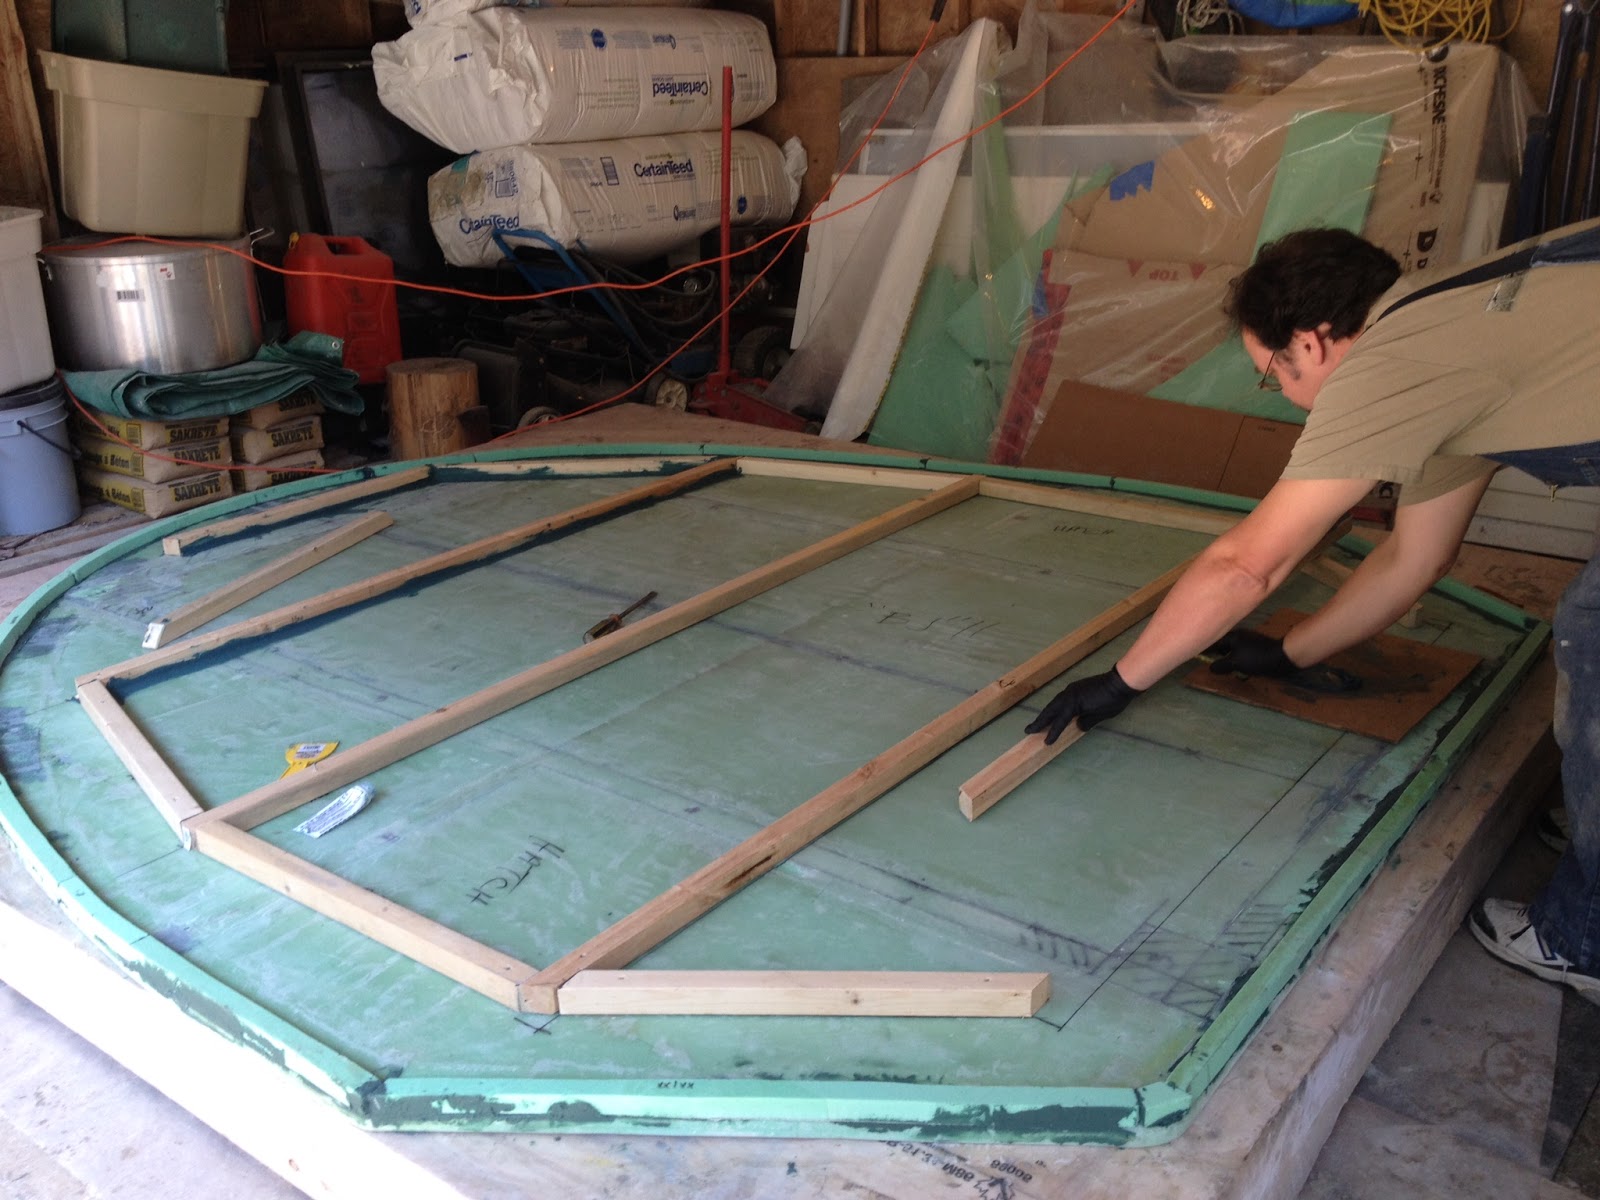 |
| Structural Ribs |
As the weather warmed up we were able to get back on the top and add the 2x2 wood stringers, rolled edges and the fairing.
 |
| Jac sanding. What a gal! |
Seems my fairing left a lot to be desired. I was fired and relegated to assistant. Jacquie and Ron took over and fixed up all of my cosmetic kinks. Add another 100 man hours. At least we were getting somewhere now. It started to look like a top. Finally ready for paint. Or maybe not yet. My build was taking too long and Ron needed to demo the garage as part of rebuilding his house. We were relegated to the side yard, covered by an old show tent from Jacquie's summer markets.
It was around this time that Ron's wife Karen asked 'Are you going to take that down to the boat for a test fit? We test fit our hard top 3 times to make sure it fit.' I'm a bit of a gambler, and have total faith in Jacquie's ability to make a pattern. I simply replied ' Nah. It will be OK' and continued to cut out hatches and help Jacquie and Ron finish the fairing. Truth be told we were now in May and I just wanted to get the f#@&ing thing finished. If it didn't fit I was going to bin it.
 |
| Captain Ron fixing my mistakes. Thanks man! |
 |
| Test fit for hatches |
 |
| Mixing primer, finally. |
There was still about 100 hours of fairing before paint. I was REALLY starting to hate this thing. But Jacquie pushed me on and we started prepping for paint.
We decided on Alex Seal for finish. Its a lot like All Craft without the cyanide. So I could apply wearing a simple respirator. We also wanted a product that could be repaired. The Alex Seal product can be applied with a roller and finished off with a brush. We used the same product on the hull and decks with fantastic results. We applied 3 coats of primer, polishing between coats. More sanding, all by hand with 300 grit. Wax on, wax off.
  |
| Primer! Finally some paint! |
Its now June and I am painting on my own. Jacquie is off to her summer markets. I have a deadline to have the top on the boat for July. Get painting boy!
 |
| First side done |
 |
| Final coat done! Shinny!!!! |
 |
| Loaded for transport |
We decided to haul out at Lions Gate Marine to install the top. They have a great yard and were willing to use the forklift to place the top. We used the transport frame, which was made from the work deck, to build the temporary cribbing on the boat. Waste not want not. We took down the backstay and had the top lifted into place. Does it fit? Will the backstay run through the hole in the top?
 |
| It fits! time to strap it down |
Stunned shock. It fits perfectly! All from a cardboard pattern Jacquie cut out over 6 months earlier. I love that woman!
The top looks gorgeous! The yard owner asked who made the top for us. 'We did' was a happy response. He looked confused, then smiled. You know the kind. The kind that says 'oh sure you did'.
Add the name back on and we are ready to splash.
 |
| Only 2 years after the paint job. Looks great! |
There was a 4 foot chop in the bay on launch day. We were terrified that a strap would fail, the top would crack, or the crib would fail and all our effort would sink into English Bay.
A tense 2 hours later and we were safely home. We had already met Roy "The Welder" at Lions Gate. He had a great plan to anchor the top on 4 2" SS posts. Jacquie had a sketch for a new radar arch, so Roy was off to his shop. He worked fast! A little over a week later all of the steel was installed and Roy was wrapping up some field welds.
 |
| Metal installed, cribbing going out. |
 |
| Running cable. Wow that's shinny! |
 |
| Time for canvas! |
 |
| Canvas and solar panels |
I tried to get Jacquie to do the canvas again. She has a Sail Rite walking foot machine after all. No joy. I used up all my credit with the sanding, painting, sweating, and lifting. "Call Denise at North Sails. I am NOT sewing any more cockpit enclosures!' The admiral had spoken.
A quick call and North Sails in September and the canvas was on before Christmas. Another 2 weeks and I had the solar panels installed. So only 12 months to build a hard top to mount solar panels on.
On time? Nope. On budget? Nope.
Happy owner. YUP!
 |
| Finished at long last! |
Sunday, April 2, 2017
LaterThanWeThink, SV Angelique of Vancouver Ep 6 There Be Whales, VonDo...
Episode 6 VonDonup Inlet and Whales
Subscribe to:
Posts (Atom)